Organising the timeline
Bringing an event to the ‘front’
Whenever you click on an event, it will be selected and brought to the ‘front’ of all other events on the timeline.
Auto-arrange
This is the default setting and is highly recommended for most uses of Histropedia.
When auto-arrange is turned on, the events on your timeline should remain neatly organised automatically, with the highest ranked events always displayed closest to the timeline.
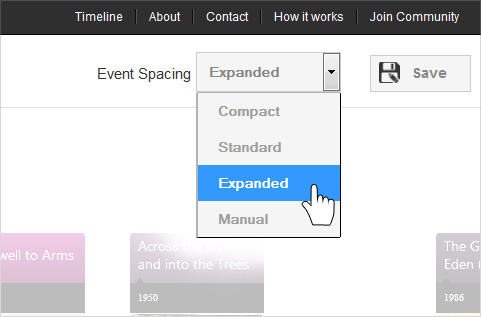
There are three options for controlling the spacing between events, "compact", "default" and "expanded".
[replace with sever file kb/spacing-options.png]
Note: Auto arrange will temporarily hide less important events when you are viewing a large timeline. You can reveal more events by zooming in to any time period - the lower ranked events will be appear as soon as there is enough space to display them.
See the auto-arrange article for more info about this feature.
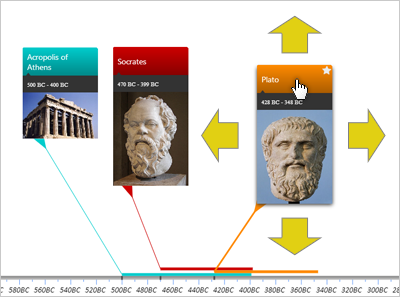
Selected and 'starred' events rank highest
By selecting and starring events, you can control how 'important' they are when auto-arrange is choosing which events to display prominently. This gives you some control over the way they are organised on the screen without needing to turn auto-arrange off completely.
Selected event
When you select an event, it temporarily becomes the highest ranked event on the timeline. The event will stay in its current position on the screen when you first select it, but as soon as you begin to scroll or zoom, auto-arrange will move the event to the front position in the stack (closest to the timeline, and in front of all other events).Starred events http://www.histropedia.com/portal/img/kb/starred.png
Starred events always outrank normal events when auto-arrange is choosing where to display them. This means that you can star any set of events that you would like to remain prominently displayed on the timeline. You 'star' an event by first selecting it, then clicking on the empty star icon http://www.histropedia.com/portal/img/kb/unstarred.png.
Manually arranging events
Drag and drop
You can click on an event card and ‘drag’ it to any desired location (holding down the mouse button as you move). The event will always remain connected to its start date on the timeline as you move it around the screen.
This is useful for making a particular custom arrangement, or to simply move an event out of the way and see what's underneath it.Note: When auto-arrange is on, the events will return to their automatic locations as soon as you start to scroll or zoom.
Turning Auto-Arrange "Off"
If you want to create a custom arrangement for your entire timeline, you can turn off the auto-arrange feature so that all events remain in the locations you have set.You can turn off auto-arrange by selecting the "manual" option from the Event Spacing drop down menu
[IMAGE - select "manual" from menu]
This is not recommended for large timelines. Auto-arrange controls the number of events on screen as well as the way they are organised, so turning it off can mean you will suddenly see hundreds of events displayed on the screen.
Stack button
Clicking on the stack button will organise the events visible on screen in a cascading pattern, as shown in the screenshot above. Off-screen events will not be affected.
The stack button is only displayed when auto-arrange is set to "manual". It provides a way to quickly tidy up a particular view without affecting the custom arrangement for the rest of the timeline.