Auto-arrange and Event spacing
Introduction
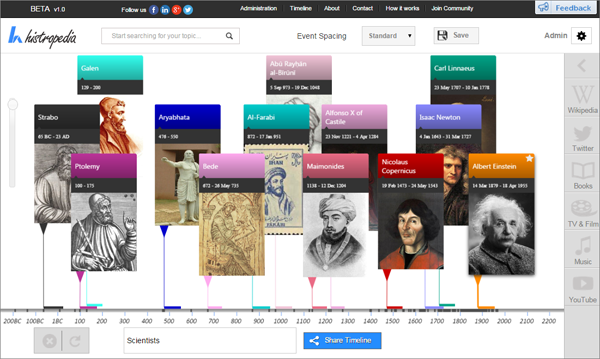
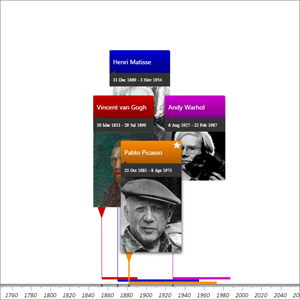
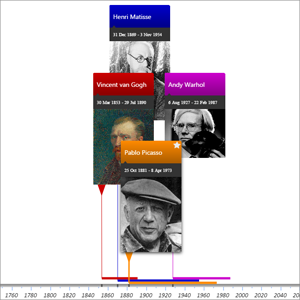
The auto-arrange feature keeps the events on the timeline neatly organised as you zoom, scroll and make changes to the timeline. The events are placed so that the highest ranked events are in the most visible position on the screen - closest to the timeline and in 'front' of all other events (as shown in the screenshot below).
The rank of each event is currently judged by counting the number of links to it from other Wikipedia articles (English Wikipedia only at present).
Hidden Events
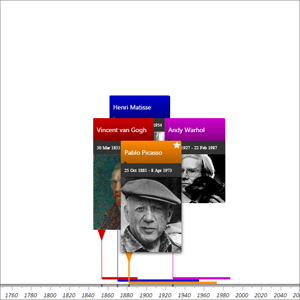
Depending on the size of the timeline you are viewing it is possible to have up to around 10,000 events within the visible time range on the screen. In order to prevent seeing an overload of information the system will only display the highest ranked events, with all of the lower ranked events being temporarily hidden. By zooming in towards a time period of interest, the hidden events will gradually be revealed as more space becomes available on the screen.
The system is designed to allow you to zoom out to see a broad overview of a timeline, or zoom in to any time period to reveal the finer details.
Every event on the timeline has a small dark grey marker on the timeline indicating the start date of the event.

These markers help you to see which areas of the timeline are most populated. Zooming in towards a region will reveal the hidden events.
You can prevent the system from hiding events if desired by selecting the "Manual" option from the Event Spacing drop down menu (see below fro more details).
Event Spacing options
There are three options for controlling the spacing between events when the auto-arrange function is running - "compact", "default" and "expanded". The "manual" setting turns off auto-arrange completely, and also stops the system from hiding less important events.
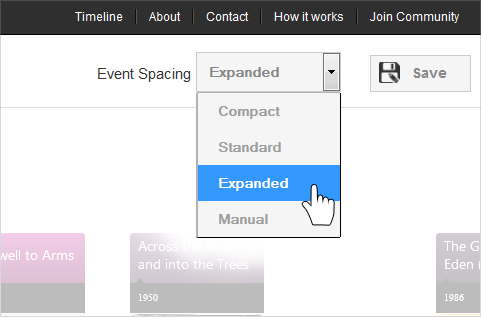
1. Compact
Minimum possible spacing between each row of events.Use this setting if you are viewing on a small screen or planning on embedding the timeline within a small window.
2. Standard
Medium spacing between each row of events.This setting still works well on small screens, but some events may be partially off the top of the screen (they will move down as you zoom in towards them).
3. Expanded
Maximum spacing between each row of events.This setting is ideal if you are viewing on a large monitor, or if you simply want a very sparse looking timeline.
4. Manual
Selecting this option will turn auto-arrange off, so events will not be re-organised automatically as you zoom and scroll. It also prevents the system from hiding less important events according to your current view, so it is not recommended for large timelines.See article organising the timeline for more info on manually arranging events.
Selected and 'starred' events rank highest
By selecting and starring events, you can control how 'important' they are when auto-arrange is choosing which events to display prominently. This gives you some control over the way they are organised on the screen without needing to turn auto-arrange off completely.
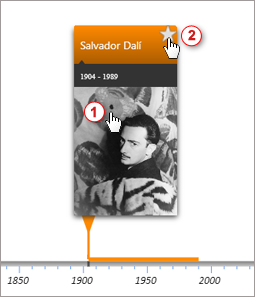
Selected event
When you select an event, it temporarily becomes the highest ranked event on the timeline. The event will stay in its current position on the screen when you first select it, but as soon as you begin to scroll or zoom, auto-arrange will move the event to the front position in the stack (closest to the timeline, and in front of all other events).Starred events 
Starred events always outrank normal events when auto-arrange is choosing where to display them. This means that you can star any set of events that you would like to remain prominently displayed on the timeline. You 'star' an event by first selecting it, then clicking on the empty star icon  .
.